| OPC DataHub™ : Version 6.4 | ||
|---|---|---|
 | Chapter 2. OPC Tunnelling |  |
| OPC DataHub™ : Version 6.4 | ||
|---|---|---|
| | Chapter 2. OPC Tunnelling | |
Now you need to set up the OPC DataHub on this machine to tunnel across to the DataHub on the OPC server machine.
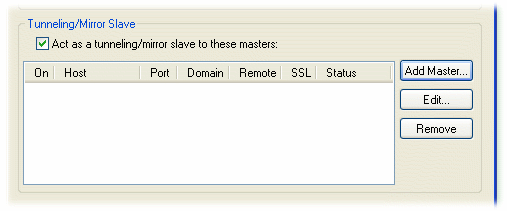
Configure the OPC DataHub as tunnelling slave
The tunnelling slave DataHub behaves exactly like the tunnelling master DataHub except that the slave establishes the tunnelling connection initially, and reestablishes it after a network break. For this reason we recommend that the DataHub on the OPC client side act as the tunnelling slave, while the DataHub on the OPC server side act as the tunnelling master.

 .
.
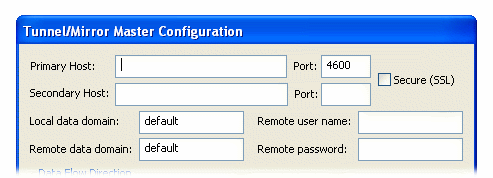
Primary Host: the name or IP address of the computer running the tunnelling master DataHub.
Port: the port number or service name for this host. You should use default port number (4600) unless you have changed the entry in the master DataHub.
Secondary Host: gives you the option to have an alternate host and service/port number. On startup or after a network break, the DataHub will search first for the primary host, then for the secondary host, alternating between primary and secondary until a connection is made. If no secondary host is specified, the connection will be attempted on the primary host only.
Local data domain: The data domain in which you plan to receive data.
Remote data domain: the master DataHub data domain from which you plan to receive data. Point names will be mapped from the remote data domain (on the master DataHub) into the local data domain (on this DataHub), and vice versa.
![[Note]](images/note.gif) | Unless you have a good reason for making these different, we recommend using the same data domain name on both DataHubs for the sake of simplicity. |
| There is a DataHub running on Cogent's server that you can connect to for testing. Here are the parameters you will need to enter for it: Primary Host: developers.cogentrts.com Port: 4600 Local data domain: test Remote data domain: test |
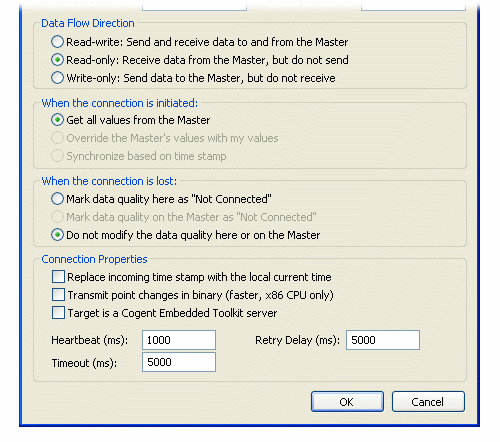
| To optimize throughput, check the Read-only: Receive data from the Master, but do not send option. Only do this if you actually want a read-only connection. If you do not require read-write access, a read-only tunnel will be faster. |
| If you have configured When the connection is initiated as (see above), then this option must be set to to get correct data synchronization. |
Replace incoming timestamp... lets you use local time on timestamps. This is useful if the source of the data either does not generate time stamps, or you do not trust the clock on the data source.
Transmit point changes in binary gives users of x86 CPUs a way to speed up the data transfer rate. Selecting this option can improve maximum throughput by up to 50%.
| For more information, please refer to Section 18.1, “Binary Mode Tunnel/Mirror (TCP) Connections”. |
Target is a Cogent Embedded Toolkit server allows this slave to connect to an Embedded Toolkit server rather than to another DataHub.
Heartbeat sends a heartbeat message to the master every number of milliseconds specified here, to verify that the connection is up.
Timeout specifies the timeout period for the heartbeat. If the slave DataHub doesn't receive a response from the master within this timeout, it drops the connection. You must set the timeout time at least twice the heartbeat time.
| To optimize this setting for slow networks, please refer to Section 18.2, “Tunnel/Mirror (TCP) Connections for Slow Networks”. |
Retry specifies a number of milliseconds to wait before attempting to reconnect a broken connection.
Configure the OPC DataHub to act as a server to the OPC client
Finally, we suggest that you ensure that the OPC DataHub on the OPC client machine is configured to act as an OPC server. Every OPC DataHub comes preconfigured that way, but it doesn't hurt to check.
 .
.
| If your OPC client requires that you hand-enter the OPC server name, use either Cogent.OPCDataHub or Cogent.OPCDataHub.1 . |
Now you can start your OPC client, connect to the OPC DataHub, and access your data.
| |  | |
| 2.2. Configuring the DataHub for the server |  | 2.4. Testing the connection |
Copyright © 1995-2010 by Cogent Real-Time Systems, Inc. All rights reserved.