| DataHub Scripting : Version 6.4 | ||
|---|---|---|
 | Chapter 5. The Application class |  |
| DataHub Scripting : Version 6.4 | ||
|---|---|---|
| | Chapter 5. The Application class | |
There are a number of methods in the Application class that you can use to create submenus and menu items on the DataHub pop-up system tray menu. Rather than examining the code, let us look at what kinds of menus can be generated. Each of the menus below has two regular items that simply print their name in the Script Log, as well as an "Exit" item that shuts down the script. A complete, working script containing all of these examples is given below. All of the methods used here are documented in Methods and Functions from Application.g.
The methods used here cause a submenu to be created on the main DataHub pop-up menu, and attach items directly to that submenu. This code:
.AddCustomMenuItem("Base 1", `princ("Base 1\n"));
.AddCustomMenuItem("Base 2", `princ("Base 2\n"));
.AddStopMenuItem("Base Exit");
Would add these menu items.

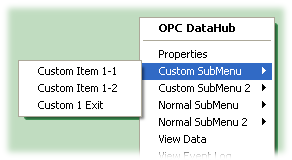
The methods used here are convenience methods that wrap the standard methods used below. They create a submenu on the main DataHub menu, attaching menu items to the immediately preceding parent, in the order written in the code. This code:
    .AddCustomSubMenu("Custom SubMenu", 3);
    .AddCustomMenuItem("Custom Item 1-1", `princ("Custom Item 1-1\n"));
    .AddCustomMenuItem("Custom Item 1-2", `princ("Custom Item 1-2\n"));
    .AddStopMenuItem("Custom 1 Exit");
Would put up this submenu.
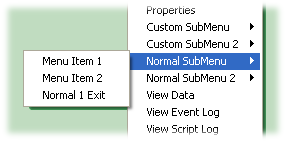
The methods used here are the standard methods used to create submenus on the main DataHub menu. Each menu item is identified by its parent, so menu items can be added in any order. This code:
    local    mymenu, mymenu2;
    mymenu = .AddSubMenu(get_tray_menu(), 3, "Normal SubMenu");
    mymenu2 = .AddSubMenu(get_tray_menu(), 4, "Normal SubMenu 2");
    .AddMenuItem(mymenu, -1, "Menu Item 1", `princ("Menu Item 1-1\n"));
    .AddMenuItem(mymenu2, -1, "Menu Item 1", `princ("Menu Item 2-1\n"));
    .AddMenuItem(mymenu, -1, "Menu Item 2", `princ("Menu Item 1-2\n"));
    .AddMenuItem(mymenu2, -1, "Menu Item 2", `princ("Menu Item 2-2\n"));
    .AddMenuItem (mymenu, -1, "Normal 1 Exit", `destroy (@self));
    .AddMenuItem (mymenu2, -1, "Normal 2 Exit", `destroy (@self));
Would put up two submenus, the first of which is open here.
This script contains all of the above examples.
/* All user scripts should derive from the base "Application" class */

require ("Application");

/* Get the Gamma library functions and methods for ODBC and/or
 * Windows programming.  Uncomment either or both. */

//require ("WindowsSupport");
//require ("ODBCSupport");

/* Applications share the execution thread and the global name
 * space, so we create a class that contains all of the functions
 * and variables for the application.  This does two things:
 *   1) creates a private name space for the application, and
 *   2) allows you to re-load the application to create either
 *      a new unique instance or multiple instances without
 *      damaging an existing running instance.
 */
class menutest Application
{
}

/* Use methods to create functions outside the 'main line'. */

/* Create submenus and add items to them, using the AddCustom* convenience methods.
   Note that the items are added in sequential order for each menu. */
method menutest.custom()
{
    .AddCustomSubMenu("Custom SubMenu", 3);
    .AddCustomMenuItem("Custom Item 1-1", `princ("Custom Item 1-1\n"));
    .AddCustomMenuItem("Custom Item 1-2", `princ("Custom Item 1-2\n"));
    .AddStopMenuItem("Custom 1 Exit");

    .AddCustomSubMenu("Custom SubMenu 2", 4);
    .AddCustomMenuItem("Custom Item 2-1", `princ("Custom Item 2-1\n"));
    .AddCustomMenuItem("Custom Item 2-2", `princ("Custom Item 2-2\n"));
    .AddStopMenuItem("Custom 2 Exit");
}

/* Create regular submenus and add items to them, using the Add* methods.
   Note that the items can be added in any order. */
method menutest.direct()
{
    local    mymenu, mymenu2;
    mymenu = .AddSubMenu(get_tray_menu(), 3, "Normal SubMenu");
    mymenu2 = .AddSubMenu(get_tray_menu(), 4, "Normal SubMenu 2");
    .AddMenuItem(mymenu, -1, "Menu Item 1", `princ("Menu Item 1-1\n"));
    .AddMenuItem(mymenu2, -1, "Menu Item 1", `princ("Menu Item 2-1\n"));
    .AddMenuItem(mymenu, -1, "Menu Item 2", `princ("Menu Item 1-2\n"));
    .AddMenuItem(mymenu2, -1, "Menu Item 2", `princ("Menu Item 2-2\n"));
    .AddMenuItem (mymenu, -1, "Normal 1 Exit", `destroy (@self));
    .AddMenuItem (mymenu2, -1, "Normal 2 Exit", `destroy (@self));
}

/* Write the 'main line' of the program here. */
method menutest.constructor ()
{
    /* Add menu items to a "Scripts" submenu that gets created automatically. */
    .AddCustomMenuItem("Base 1", `princ("Base 1\n"));
    .AddCustomMenuItem("Base 2", `princ("Base 2\n"));
    .AddStopMenuItem("Base Exit");

    /* Create the normal menus. */
    .direct();

    /* Create the custom menus. */
    .custom();
}

/* Any code to be run when the program gets shut down. */
method menutest.destructor ()
{
}

/* Start the program by instantiating the class.  If your
 * constructor code does not create a persistent reference to
 * the instance (self), then it will be destroyed by the
 * garbage collector soon after creation.  If you do not want
 * this to happen, assign the instance to a global variable, or
 * create a static data member in your class to which you assign
 * 'self' during the construction process.  ApplicationSingleton()
 * does this for you automatically. */
ApplicationSingleton (menutest);
| |  | |
| 5.4. Timers |  | Appendix A. Basic Troubleshooting |
Copyright © 1995-2010 by Cogent Real-Time Systems, Inc. All rights reserved.