| OPC DataHub™ : Version 6.4 | ||
|---|---|---|
 | Chapter 19. Properties Window |  |
| OPC DataHub™ : Version 6.4 | ||
|---|---|---|
| | Chapter 19. Properties Window | |
 | This option in the Properties Window lets you set up the OPC DataHub to act as an OPC server, an OPC client, or both simultaneously. |
The OPC DataHub can act as a client to one or more OPC servers.
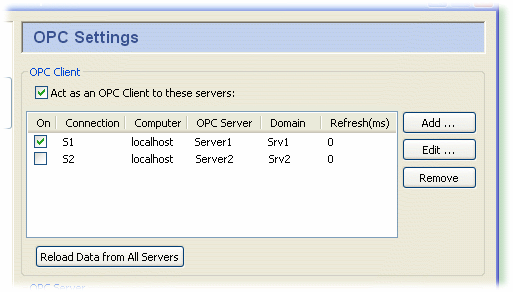
Check the box for OPC client functionality. Since the DataHub can be a client to more than one OPC server, you need to specify server information for each OPC client connection. Once you have a server listed, you can activate or deactivate the connection using its On check box.
To add a server, press the button to open the Define OPC Server window described below. To edit a server, double-click it or select it and press the button to open that window. To remove a server, highlight it and click the button.
Pressing the button causes the DataHub to disconnect from all OPC servers, and then reconnect and refresh the data set for each server.

To define or redefine an OPC server connection, click the or button to open the Define OPC Server Window:
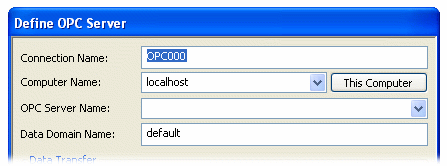
A name used by the OPC DataHub to identify the connection. There should be no spaces in the name. It doesn't matter what name is chosen, but it should be unique to other connection names.
The name or IP address of the computer running the OPC server you want to connect to. Select it from the drop-down list, or type it in.
The name of the OPC server that you are connecting to, selected from the list of available servers.
The name of the DataHub domain in which the data points are received.
The OPC DataHub supports OPC DA 2.0 and OPC DA 3.0 client protocols. DA 3.0 support consists of browsing support and support for the WriteVQT (Value, Quality, Timestamp) methods of the DA 3.0 specification. Normally, the OPC DataHub will determine whether a particular server is DA 3.0 compliant based on the registry entries made by the server when it was installed.
If the server is DA 3.0 compliant, then the OPC DataHub will always use DA 3.0 browsing, as it is substantially faster than DA 2.0 browsing. If the server claims to be DA 3.0 compliant, but does not offer the DA 3.0 browsing interface, the OPC DataHub will attempt to drop back to the DA 2.0 browsing interface.
In some cases, the server's DA 3.0 compliance cannot be determined. This is true if the server name is specified as a GUID in the form {nnnnnnnn-nnnn-nnnn-nnnn-nnnnnnnnnnnn} where each n is a hexadecimal digit. In this case, the OPC DataHub will default to only use the OPC DA 2.0 browsing interface. You can force the use of DA 3.0 or DA 2.0 using the respective option, as explained below.
![[Note]](images/note.gif) | For testing purposes, there is also a registry key that can be used to globally override the use of DA 3.0 browsing for all OPC connections. If the DWORD registry value: HKEY_CURRENT_USER\Software\Cogent\OPC DataHub\BrowseDA3 exists, its value will be interpreted as follows: 1: Always use DA 3.0 browsing, regardless of the server settings 0: Never use DA 3.0 browsing, regardless of the server settings Since this key is global to all OPC client connections, it should not be created at all unless a particular testing scenario requires it. The setting will take effect the next time a connection to the OPC server is made. |
With all of these considerations in mind, you have several options for specifying how the data is to be transferred:
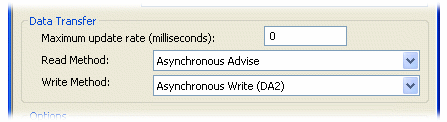
This option lets you specify an update rate, useful for slowing down the rate of incoming data. The default is 0, which causes values to be updated as soon as possible. This value is also the polling time used by asynchronous and synchronous reads (see below).
Choose how to read data from the OPC server:
Asynchronous Advise The OPC server sends a configured point's data to the DataHub immediately whenever the point changes value. This is the most efficient option, and has the least latency.
Asynchronous Read The DataHub polls the OPC server for all configured points on a timed interval (set by the Maximum update rate). This option is less efficient than Asynchronous Advise, and has higher latency.
Synchronous Cache Read The DataHub polls the OPC server for all configured points on a timed interval (set by the Maximum update rate), and this thread waits for a reply. This option is less efficient than Asynchronous Advise or Read, and has higher latency than either of them.
Synchronous Device Read The DataHub polls the PLC or other hardware device connected to the OPC server for all configured points on a timed interval (set by the Maximum update rate), and this thread waits for a reply. This is the least efficient of all of these options, and has the highest latency.
Choose how to write data to the OPC server:
Asynchronous Write The OPC DataHub writes to the OPC server and does not wait for a response. This provides the highest overall performance.
Synchronous Write The OPC DataHub writes to the OPC server and waits for a response each time. This elicits a quicker response for a given item from the OPC server, but results in lower overall performance. This option is useful if the OPC server doesn't support asynchronous writes at all, or if it can't handle a large number of them.
For these options, the DA 2.0 write methods only transmit a point's value, allowing the server to assign a quality and timestamp as it sees fit. The DA 3.0 methods (WriteVQT, supported by DA 3.0 servers only) transmit the Value, Quality, and Timestamp of a point.
There are several optional entries:
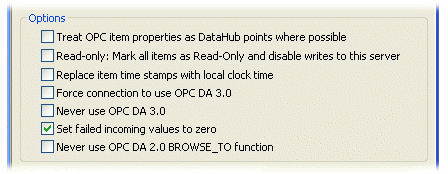
This option lets you register and use each OPC item property as point in the DataHub.
![[Important]](images/important.gif) | Some OPC servers are slow to register their OPC items and properties. Using this option with one of these servers can significantly slow the start-up time of the DataHub |
Here you can specify that the OPC server be read-only, regardless of how individual items are specified. Items in the DataHub that originate from such an OPC server will be read-only to all DataHub clients.
This option allows you to set the timestamps for the items from this server to local clock time.
This setting will allow the user to choose the DA 3.0 write methods from the Write Method drop-down box. It will also instruct the OPC DataHub to attempt to browse the server using DA 3.0 browsing. This setting will override any automatic information that the OPC DataHub may determine about the server based on the server's registry entries.
This setting will remove the DA 3.0 write methods from the Write Method drop-down box, and will instruct the OPC DataHub to only use DA 2.0 browsing. This setting will override any automatic information that the OPC DataHub may determine about the server based on the server's registry entries.
The OPC spec requires an OPC server to send an EMPTY (zero) value whenever it sends a failure code in response to an item change or a read request. Some OPC servers, however, send a valid value with the failure code under certain circumstances. To ignore any such value from the OPC server and assume EMPTY, keep this box checked (the default). If instead you want to use the value supplied by your OPC server, uncheck this box.
| Unchecking this box will make the OPC DataHub's behavior non-compliant with the OPC specification. |
This setting will disallow the BROWSE_TO function when communicating with OPC DA 2 servers. Sometimes an OPC server will have problems with this function that prevent the OPC DataHub from connecting to it. Checking this box might allow the connection to be established in those cases.
You can select all items, filter for specific items, or select items manually.
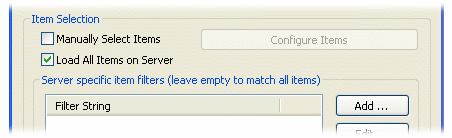
Check the box and press the button to open the OPC Item Selection window, where you can specify exactly which points you wish to use:
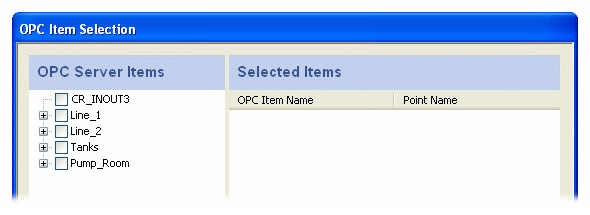
You can browse through the tree in the left pane, selecting points as you go. The selections will appear in the right pane. Follow these guidelines for making selections:
To select a server item from the right-hand pane, click its check-box.
To highlight a list of consecutive server items, click the first item, hold down the Shift key, and then click the last item. To highlight separate server items, hold down the Ctrl key as you click each item. To select a group of highlighted items, use the Spacebar.
Selecting a server item does not automatically add any of its child items. Each child item must be added separately. To view child items, click the + sign in front of the item. If an item has one or more children that have been selected, the item name(s) will appear in bold.
To delete selected items from the right-hand pane, highlight them and press the button. Use the Shift and Ctrl keys as above to highlight groups of selected items.
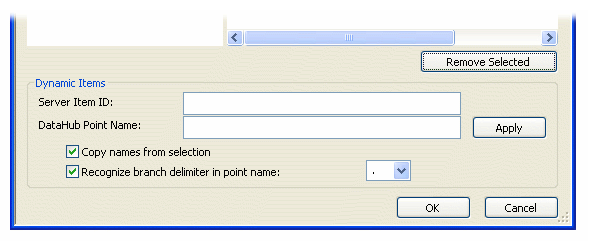
You may also configure dynamic items on the server. As you type in the Server Item ID, the system will fill in an identical DataHub Point Name for you (which you can change at any time). Press the Enter key or the button to create the item. Checking the box will fill in the entry with the name you select from the Selected Items list (above). The option lets you select and apply a point delimiter for your dynamic items.
In addition to manually loading items, you have the option in the Define OPC Server dialog to register all points, or filter for groups of points, from the OPC server.
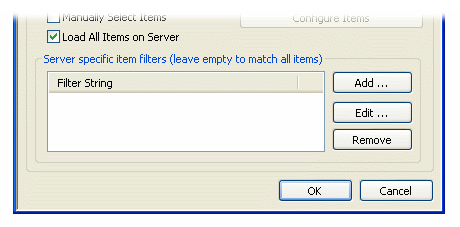
In the Server specific item filters area you can enter one or more strings to filter for groups of items in the OPC server. Use the or button to open the Edit a filter string window:
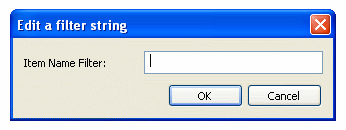
Enter a string that matches an item name, or a pattern to match multiple names. Each OPC server has its own syntax for pattern matching, so you may have to experiment a little to get exactly the points you need. Commonly, the symbol * matches any number of characters, while the symbol ? often matches a single character. In that case, an entry of ?a* would bring in all items with a as the second letter in their names.
The OPC DataHub can act as a server to any number of OPC clients.

Check the box to have the OPC DataHub function as an OPC server.
| If your OPC client requires that you hand-enter the OPC server name, use either Cogent.OPCDataHub or Cogent.OPCDataHub.1 . |
The option tells the OPC DataHub not to alter its registry settings. This is useful if you want to use the OPC DataHub with a redundancy server or some other program that modifies the DataHub's registry independently. Without this box checked, the DataHub will overwrite any external changes when it starts or when a change to the status is applied.
These two boxes work together, because turning the OPC server behavior on or off necessarily makes changes to the registry. Here is how you can change OPC server behavior when you also need to maintain registry settings:
If you need to connect the OPC DataHub over a network and for some reason you can't use tunnelling, here is an option to facilitate COM configuration

Check this box to relax COM security. This setting will override the COM permission settings for the application, but will not override the system's global COM restrictions. It is common for OPC servers to operate at minimal DCOM security settings, since high security interferes with connectivity and most control systems do not operate in hostile network environments. If in doubt, consult your system administrator.
| |  | |
| Chapter 19. Properties Window |  | 19.3. Tunnel/Mirror |
Copyright © 1995-2010 by Cogent Real-Time Systems, Inc. All rights reserved.